“`html
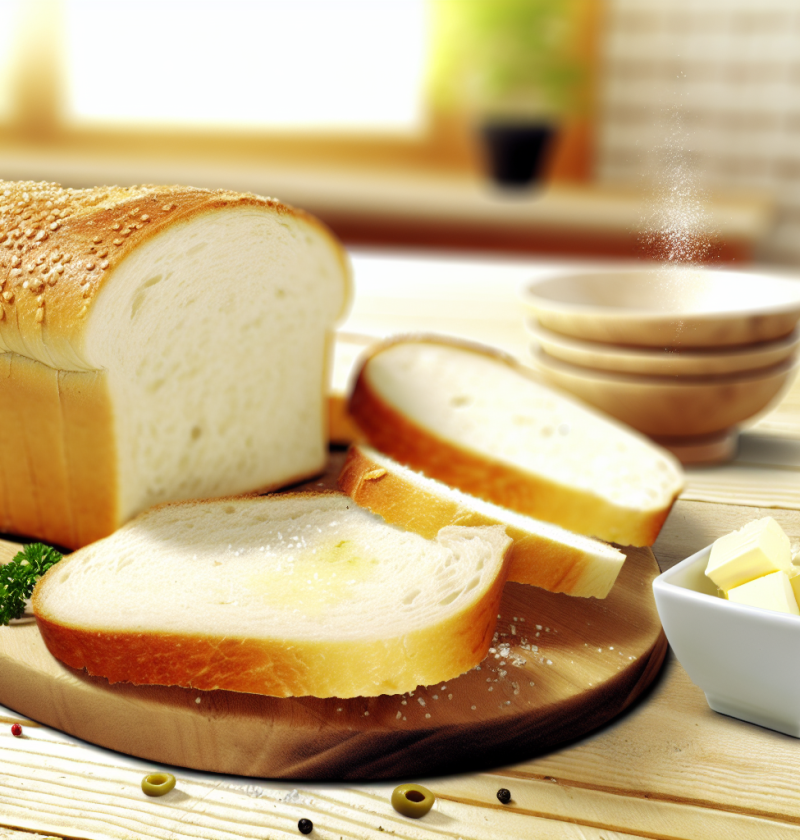
The Ultimate Guide to Enjoying Perfectly Sliced Bread Loaves!
Imagine a beautifully baked loaf of bread, golden and crusty on the outside and soft and pillowy on the inside. Picture slicing into it, releasing a warm, inviting aroma that fills your kitchen and beckons your family to gather around. Whether it’s for breakfast, lunch, or a cozy dinner, knowing how many slices you can get from a loaf of bread not only prepares you for the perfect sandwich but also sparks joy in the simplicity of good, homemade bread. Dive into the world of this beloved staple and learn to slice your way to bliss!
Preparation Time
- Preparation: 10 minutes
- Cooking time: 25 to 30 minutes
- Total: 40 minutes
This recipe makes approximately 12 slices, making it perfect for 4 to 6 delightful servings, depending on how generously you choose to cut. Preparing this loaf is a medium-difficulty project, but I promise the experience is deeply rewarding, especially when you share the fruits of your labor with loved ones.
The Necessary Ingredients
- 3 cups all-purpose flour (or gluten-free flour blend)
- 1 cup warm water
- 1 tablespoon sugar
- 2 teaspoons salt
- 2 teaspoons active dry yeast (or instant yeast)
- 2 tablespoons olive oil (or any vegetable oil)
- Optional: Seeds or herbs for flavoring (like sesame seeds or rosemary)
- Vegan option: Replace honey with agave syrup or maple syrup
Feel free to experiment with alternative flours such as whole wheat, spelt, or even chickpea flour for a unique twist. You can also use a plant-based milk instead of water for an enriched flavor and nutrition boost!
The Steps of Preparation
Getting the perfect loaf is as easy as following these simple steps. The beauty embodies not just the science of baking, but the art of loving anyone with the warmth of home-baked bread.
- In a large mixing bowl, combine warm water, sugar, and yeast. Allow it to sit for 5-10 minutes until frothy.
- Add olive oil, salt, and flour gradually, mixing until a dough forms.
- Knead the dough on a floured surface for about 10 minutes until smooth and elastic.
- Place the dough in a lightly greased bowl, cover with a damp cloth, and let it rise in a warm place for 1-2 hours or until doubled in size.
- Punch down the dough to release air, then shape it into a loaf.
- Place the loaf in a greased loaf pan and cover again for another 30 minutes.
- Preheat the oven to 375°F (190°C) while the bread is rising.
- Bake the loaf for 25-30 minutes or until golden brown and sounds hollow when tapped on the bottom.
- Remove from the oven, cool in the pan for 10 minutes, then transfer to a wire rack to cool completely before slicing.
Nutritional Benefits
- High in carbohydrates, providing a great energy source.
- Whole grain options offer additional fiber, aiding in digestion.
- Rich in various B vitamins which are essential for metabolic functions.
- Homemade bread generally contains fewer additives compared to store-bought loaves.
- Can be fortified with seeds or whole grains for added nutritional value.
Once you’ve mastered the basics, you can begin enhancing your bread by adding herbs and flavors. A sprinkle of garlic powder or fresh rosemary can transform your simple loaf into something extraordinary!
Possible Additions or Upgrades
- Add cheese- chunks of cheddar or feta for a savory twist.
- Incorporate olives or sundried tomatoes for Mediterranean flair.
- Drizzle in some honey for a touch of sweetness.
- Swap out a portion of the flour for oats or flax for extra nutrients.
- Top with sesame or poppy seeds before baking for added texture and flavor.
As I’ve poured my heart into these loaves, I can’t help but cherish the moments spent with family sharing slices fresh from the oven, slathered with butter—it’s an experience that warms the soul.
Q & A
**How many slices can I expect from one loaf?**
You can typically get around 12 slices from a standard loaf, but this may vary based on how thickly you slice!
**Can I use whole wheat flour instead?**
Absolutely! Whole wheat flour can be used, but note that it may result in a denser loaf.
**What if my dough doesn’t rise?**
It could be due to expired yeast or an insufficient warm environment. Try to ensure your water isn’t too hot or cold.
**Can I make this recipe vegan?**
Yes! Just substitute any dairy or honey with plant-based alternatives, and you’re all set!
**Can I double the recipe?**
Yes! Just ensure you have a sufficiently large bowl for mixing and enough space when baking.
**What’s the best way to store leftover bread?**
Store in a bread box or wrap in a clean kitchen towel. Avoid plastic bags to maintain crispiness.
**Can I freeze the bread?**
Yes! Wrap it well and store it in an airtight container or freezer bag for up to three months.
**How can I use this bread for sandwiches?**
Slice it to your desired thickness for sandwiches, or toast it to enhance its flavors.
**What can I do if my bread is too dense?**
Be careful not to over-knead, and ensure accurate measurement of liquids and yeast.
**Can I add flavorings to my bread?**
Definitely! Experimenting with herbs, garlic, or cheese can elevate the taste significantly.
Now I encourage you to try this delightful recipe and experience the joy it brings! Feel free to share the joy by spreading it on your social networks or sharing with friends, as bread is truly best enjoyed together!
“`